The Magic of Making

Lately, I have had a list of baking projects on my mind. A warm kitchen helps in getting through the cold winter months just as much as a hat, scarf, and mittens, if not more than those woolens. Truthfully, though, this list doesn’t disappear when the snow melts. Even when its too hot to turn on the oven, I have at least one or two recipes I want to try. I made this the other night and have been thinking about these and those, but I can’t eat cake and cookies everyday (right?). So I keep some on the list and try others.
I’ve been thinking about making croissants since I saw the recipe in the King Arthur Flour Whole Grain Baking Book. We have a first Sunday of the month brunch potluck so for this occasion, croissants moved to the top of my-long-list-of-things-I-want-to-bake. I am glad that I took the opportunity to make them because the process was fun, not too difficult and turned out amazingly well. That is: fun, if you like playing with dough, and not too difficult if you have some time to make the dough the day before you want to eat them.
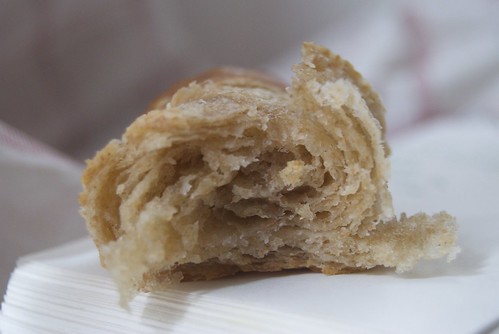
As for how they turned out, I was nervous. I carefully completed each step and left the dough to rest and rise a bit overnight. As I was going to bed, I started to wonder if the dough I had made could possibly result in the layers of flaky pastry I hoped for in a croissant. I worried that I had not rolled, folded and turned the dough enough to make a real croissant. It took me a while to fall asleep, but my worrying was unnecessary. When I pulled them out of the oven, they were golden brown and crusty on the outside and soft and flaky on the inside.
Some might say that making pastries at home is a ludicrous pursuit considering that it is easy to find good ones in a bakery. I, on the other hand, am slightly obsessed with making things from scratch. As I’ve mentioned before, I will trade convenience for creativity without a second thought. I heartily believe in the magic of making something that seems like you couldn’t possibly create it with your own hands. Surprisingly, baking takes some faith. After my doubts with making puff pastry dough, I have been reassured that the combination of flour, butter, yeast and other disparate ingredients will rarely disappoint and often surpass my expectations.
Whole Wheat Croissants
Adapted from the King Arthur Flour Whole Grain Baking Book.
I like to use whole grains as much as possible and I love the flavor of these croissants — just a little heartier since they are made with whole wheat flour. This is a basic yeasted puff pastry dough and it can be used for other pastries applications like pain au chocolat or other filled croissants. It takes some time to make, but most of that time is for the dough to rest and chill, the active time is much shorter. The instructions look long, but I gave as much detail as possible to make sure you know what you are doing! I recommend measuring ingredients by weight, for greater accuracy, but I have also included the cup measurements.
Makes 24 small croissants, or you can freeze half the dough and use it another time.
Dough
10 ounces (2 1/2 cups) whole wheat flour
12 3/4 ounces (3 cups) unbleached white flour
7/8 ounce sugar (2 tablespoons) sugar
1/2 ounce (2 tablespoons) nonfat dry milk
2 teaspoons salt
1 1/2 teaspoons yeast
1 egg
13 ounces (1 1/2 cups plus 2 tablespoons) water
Butter
16 ounces (2 cups/4 sticks) unsalted butter
1 1/8 ounces (1/3 cup) whole wheat flour
1 egg beaten with 1 tablespoon water, to glaze
For the dough: Combine flours, sugar, nonfat dry milk, salt and yeast in the bowl of a mixer using the paddle attachment. Beat together the egg and water and add to the dry ingredients with the mixer on low speed. Alternatively mix dry ingredients by hand and mix in the wet ingredients. Knead the dough gently on a floured surface to make sure the moisture is distributed and the dough is smooth. Carefully pat the dough into a 9-inch square (feel free to get out your ruler for this whole process) and wrap loosely in plastic. Refrigerate for one hour.
Meanwhile, mix the butter and flour until smooth and well blended. Adding flour to the butter keeps the butter stabilized so it doesn’t leak out of the dough when rolled. Lightly flour a piece of parchment or plastic and pat the butter into an 8-inch square. Cover and refrigerate for at least 30 minutes.
When the time is up, remove the dough from the fridge and place on a lightly floured surface. Gently roll the dough into a 12-inch square. Place the unwrapped butter square on the dough at a 45-degree angle so that the corners of the butter square face the middle of each side of the dough square. Pull the flaps of the dough over the edges of the butter so they meet in the middle. Press each flap to remove any air bubbles and then seal the edges of the dough together, using water if necessary.
Dust the top of the dough with a bit of flour (the less added flour, the better, just add enough so it won’t stick) and turn it over. Gently tap it with a rolling pin into a rectangle and roll it out into a larger triangle 20 by 10 inches. As you roll, take care to make sure the dough doesn’t get stuck to the surface it is on. When the dough is the right size, fold it in thirds, like a letter (fold the right third in, then the left third in). Then, turn the folded dough ninety degrees to the right. This is the first turn (there are 4 total).
If the dough springs back when you try to roll it, it isn’t relaxed enough and should be refrigerated for about 20 minutes before doing the next turn. If it is relaxed, roll the dough out to 20 by 10 inches again, fold in the sides and turn it 90 degrees. Again, make sure the dough is relaxed (refrigerate if needed) and roll it out, fold it and turn it. For this dough you will make 4 turns.
At this point you can freeze half of the dough, tightly wrapped in plastic for up to one month. Take the part you are not freezing and wrap it loosely in plastic. It should be refrigerated for at least 2 hours, but preferably overnight.
Making the Croissants:
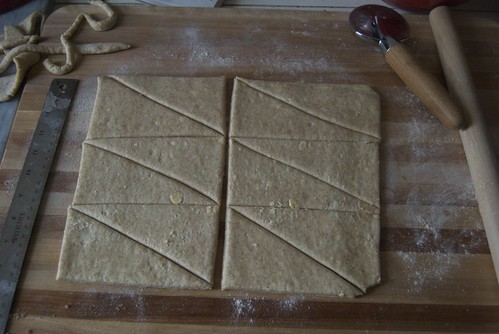
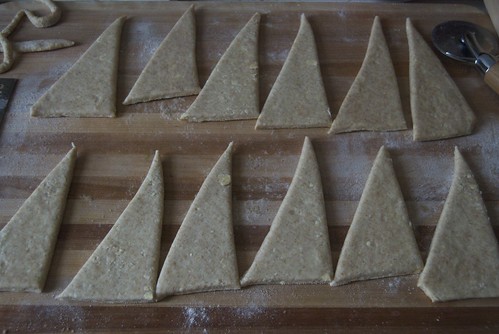
Place the dough (if you did not freeze any, then start with half of the dough and repeat these instructions with the other half) on a lightly floured surface and roll it into a 19 by 13 inch rectangle. Trim and discard the edges of the dough so the sides are all even. Cut the dough in thirds lengthwise and in half through the middle. You will now have six 4 by 9 inch rectangles. Cut each rectangle in half, diagonally so you have 12 triangles. Arrange them with the short end of the triangle closest to you. Cut a 1/2 inch notch into the center of the short end of each. Roll each triangle, starting with the notched end and going toward the tip. Make sure the tip is tucked under the bottom of the croissant. Bring the ends toward each other to form the crescent.
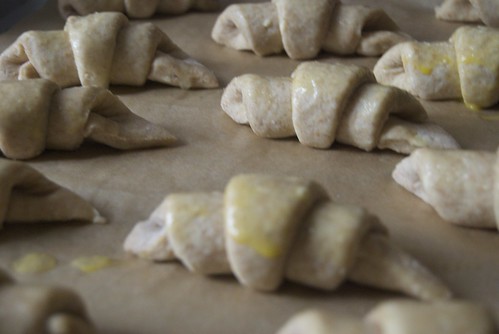
Place each croissant on a baking sheet lined with parchment. Cover and chill for at least 30 minutes so the butter won’t run out of the layers too quickly when baking.
Meanwhile preheat the oven to 425 degrees. When ready to bake: Take the croissants out of the refrigerator, brush with the beaten egg mixture. Bake for 15 minutes, reduce heat to 350 degrees and bake for 10 to 15 minutes more. They should be golden brown all over. Remove from the oven and let cool completely on a rack.
Comments are closed.
Karine
February 9, 2010 at 2:33 amYou did an amazing job! They look delicious. Thanks for sharing 🙂
Jess
February 9, 2010 at 4:29 pmalright Anna, you've convinced me to finally take the croissant plunge. Been contemplating for years – really. They look fabulous!
Emily
February 20, 2010 at 4:52 pmAnna, they look beautiful! This was so well written, too, that I think you should turn it all into a cookbook!!