Making Sourdough Bread
Once your starter is strong enough (a week to ten days after you started it), you can bake bread. Sourdough bread is leavened only by the wild yeast that has colonized your starter, though you can add a pinch of commercial yeast for extra lift, if you wish. This wild yeast needs a slow, cool rise as opposed to the warm quick rise of bread made with commercial yeast. I let my dough rise for most of the day and tend to it for a few minutes here and there. Longer rises build greater flavor in the bread but can be slowed even further by refrigerating the dough if you don’t have time to get to the next step. You see, it takes some planning but doesn’t require a lot of time or commitment to make incredibly delicious bread.
First: gather your ingredients. My favorite loaf right now uses a whole grain starter and a mix of whole grain flours and unbleached white bread flour. Keep it simple at first and try the same flour combination more than once until you are comfortable baking, then add other flours as you wish. It is easiest to use a variety of flours when measuring by weight rather than volume. Begin with:
9 ounces of ripe starter
18 ounces of flour – for a lighter bread, use one third unbleached bread flour, then add whole wheat, (or whole spelt, rye, a little cornmeal…)
12 ounces cool unchlorinated water
Mix your dough: I like to knead and mix the dough by hand, but you can also use the dough hook of a stand mixer. The first mixing is just to combine the starter, flour and waters. Stir or mix them together until the flour and water are completely combined. The dough will be shaggy, not smooth. Cover and let rest for about 20 minutes. This rest is called the autolyse and it gives the flour a chance to absorb the water without salt interfering. The dough will be easier to work with after the rest. When you are ready, add:
1 tablespoon honey
2 teaspoons salt
Knead the dough or mix it slowly in the stand mixer. It will be sticky and somewhat unwieldy. Wet hands don’t stick as much to the dough. You can also flour your hands, but try not to add too much more flour to the dough. I like to knead my dough on a silpat to keep it from sticking to the counter. It is also helpful to use a bench scraper to scrape up the dough and knead it together. Work to incorporate the honey and salt and then continue kneading until it is smooth.
Coat the inside of a bowl with olive oil and place the dough inside it. Cover the bowl to keep the dough moist and leave it on the counter for 45 minutes to an hour. After the time has past, with wet or oiled hands, grab the middle of the dough. Lift it up so two ends of the dough hang down toward the bowl. It should be pretty loose and stretchy. Replace the dough in the bowl and lift it again, this time grabbing from the ends that were loose the first time. Cover the dough and let rest for another 45 minutes to an hour. Once the time has past, lift the dough the same way you did before. Cover and let rest for another 45 minutes.

After the final rise in the bowl, it is time to shape the loaves. I like round, free form loaves, but you could also bake the sourdough in an oiled loaf pan. This recipe makes two small or one large loaf. Remove the dough from the bowl and place on a lightly floured counter or silpat. If you are making two loaves, cut the dough in half with a bench scraper or knife. To make round loaves, pull the edges of each piece of dough into the center. Use your hands to press the edges together and shape the dough into a round.
Sourdough bread does not hold its shape easily so it must be placed in a proofing basket or bowl to rise. Special banneton and other proofing baskets are available in stores, but all you really need is a clean tea towel and a bowl that will fit the round of dough. Sprinkle the tea towel with a generous amount of flour and use it to line the bowl. Place the shaped loaf, smooth side down, in the bowl. Cover and let rise.
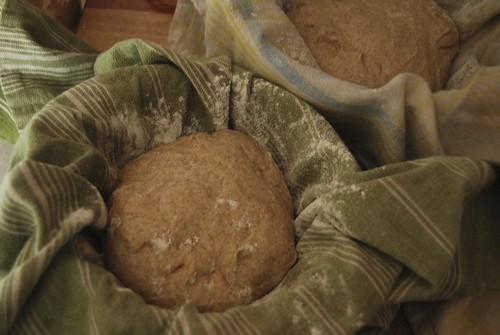
I usually let the dough rise longest when it is in the loaf shape because that makes the best loaf. Let it rise for a couple of hours. At least a half hour before you a ready to bake, preheat the oven to 450′ F. If you have a baking stone, make sure that is in the oven, too. If you do not have a baking stone, get a baking sheet ready for the loaves. At high heat my oven produces a nice crusty loaf so I don’t bother to add steam to the oven. Added steam will ensure that your loaf has the crustiness of bakery bread. To create steam, place a cast iron pan on the bottom rack of the oven while it is preheating. Boil water on the stove before you put the bread in the oven. When you put the bread in the oven, carefully pour about half a cup of hot water into the cast iron pan (protect your hands from hot steam with oven mitts). Close the oven door and, after about five minutes of baking, check to see if there is still water in the pan. Add more if you need to.
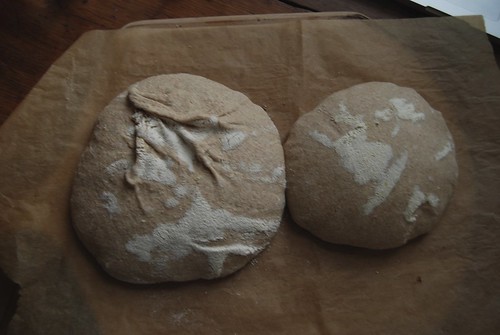
When the oven is ready and your shaped loaf has finished rising it is time to bake. If you are using a baking stone, it helps to have a peel, lined with parchment paper, to slide the loaves onto the stone. Carefully lift the tea towel full of dough out of the bowl and gently flip the loaf over onto the parchment/peel or baking sheet, making sure not to deflate the risen dough. Brush off excess flour and slash the dough with a sharp knife or razor. The slash marks help excess steam escape in a decorative way. It can be tricky to get perfect slashes, but baking bread is best learned by doing.
Slide the bread into the oven, add steam if you like. After about 10 minutes, reduce the heat to 425′. Continue baking for 25 to 30 minutes more, until the internal temperature of the bread is 210′. The bread should make a hollow sound when thumped on the bottom if it is ready, but I always doubt myself when checking this way. Checking with an instant read thermometer will insure that your bread is cooked perfectly. When it is ready, remove the loaf or loaves from the oven and let cool on a rack.
Freshly baked bread is an amazing treat, I can never resist slicing off an end and spreading it with butter. Just be sure to let the bread cool for at least 20 minutes before slicing.
Questions? Tips? Techniques? I’d love to hear from you.