It is Worth the Wait
Writing my newsletter this week got me thinking about the small changes that, over time, add up to something big. Searching for signs of spring among the snow and gray, I’ve noticed that the birds are singing as they always do this time of year. The much longer days, filled with birdsong, are signs that the spring is surely on its way even if it’s hard for me to see. Sooner or later snow will melt, green shoots will poke out of the ground, leaves will sprout and slowly but surely the world will go from gray to green.
No matter what you are trying to accomplish, I think its important to remember the way that slowly, small things add up. A few minutes of writing each day won’t immediately yield a novel, but this time is still an important part of the process. You have to take many mediocre photographs to get one good one. Like a garden growing from seeds, attention and care are required before you can harvest anything and reach the results that you want.
Bread baking, too, is a process of many small steps that gradually end up as a warm loaf pulled from the oven. Practice, a bit of patience, and sporadic attention eventually coax the flour, water, and yeast into something you can slice and eat. Of course, you could find instant gratification in a ready to eat loaf at many bakeries and grocery stores. But you will rarely get a fresh warm loaf like the one that you can make in your own kitchen. As I keep telling myself about the arrival of spring, it is worth the wait.
I haven’t made a loaf of raisin bread in years but since I seem to be indulging most of my baking desires these days, when it crossed my mind, I knew I had to get some raisins.This cinnamon raisin bread has, perhaps, the nicest texture of any loaf I’ve made. It is soft yet very sturdy. Perfect for slicing for peanut butter and jelly sandwiches, toasting and spreading with butter or enjoying as is. The recipe has several steps, but none of them take much time and, over the course of a day, you will make two incredible loaves of bread.
Cinnamon Raisin Bread
Adapted from The Bread Bible by Rose Levy Berenbaum (This book is a great resource if you want to learn more about bread baking and has tons of information. I tried to slightly simplify the instructions here)
There are a few options when making these loaves: you can use all white flour instead of white and whole wheat but as usual I love the flavor and texture with whole wheat flour added. You can omit the cinnamon sugar swirl and just add raisins though the swirl is not overly sweet and tastes so good. I definitely recommend using a kitchen scale for this recipe since it is much easier to measure the flour accurately by weight. The recipe uses instant yeast which does not need to be proofed in water. Since I bought a large bag of instant yeast I have been using that in all recipes requiring yeast and it works really well. You can make this recipe in one day or over a couple of days, depending on whether you refrigerate the sponge overnight.
For the sponge:
12 ounces (2 1/4 cups plus 2 1/2 tablespoons) unbleached white flour
14.3 ounces (scant 1 3/4 cups) water
1.5 ounces (2 tablespoons plus 1 teaspoon) honey or sugar
3/4 teaspoon instant yeast
For the flour mixture:
11 ounces (2 cups plus 3 tablespoons) whole wheat flour
3/4 teaspoon instant yeast
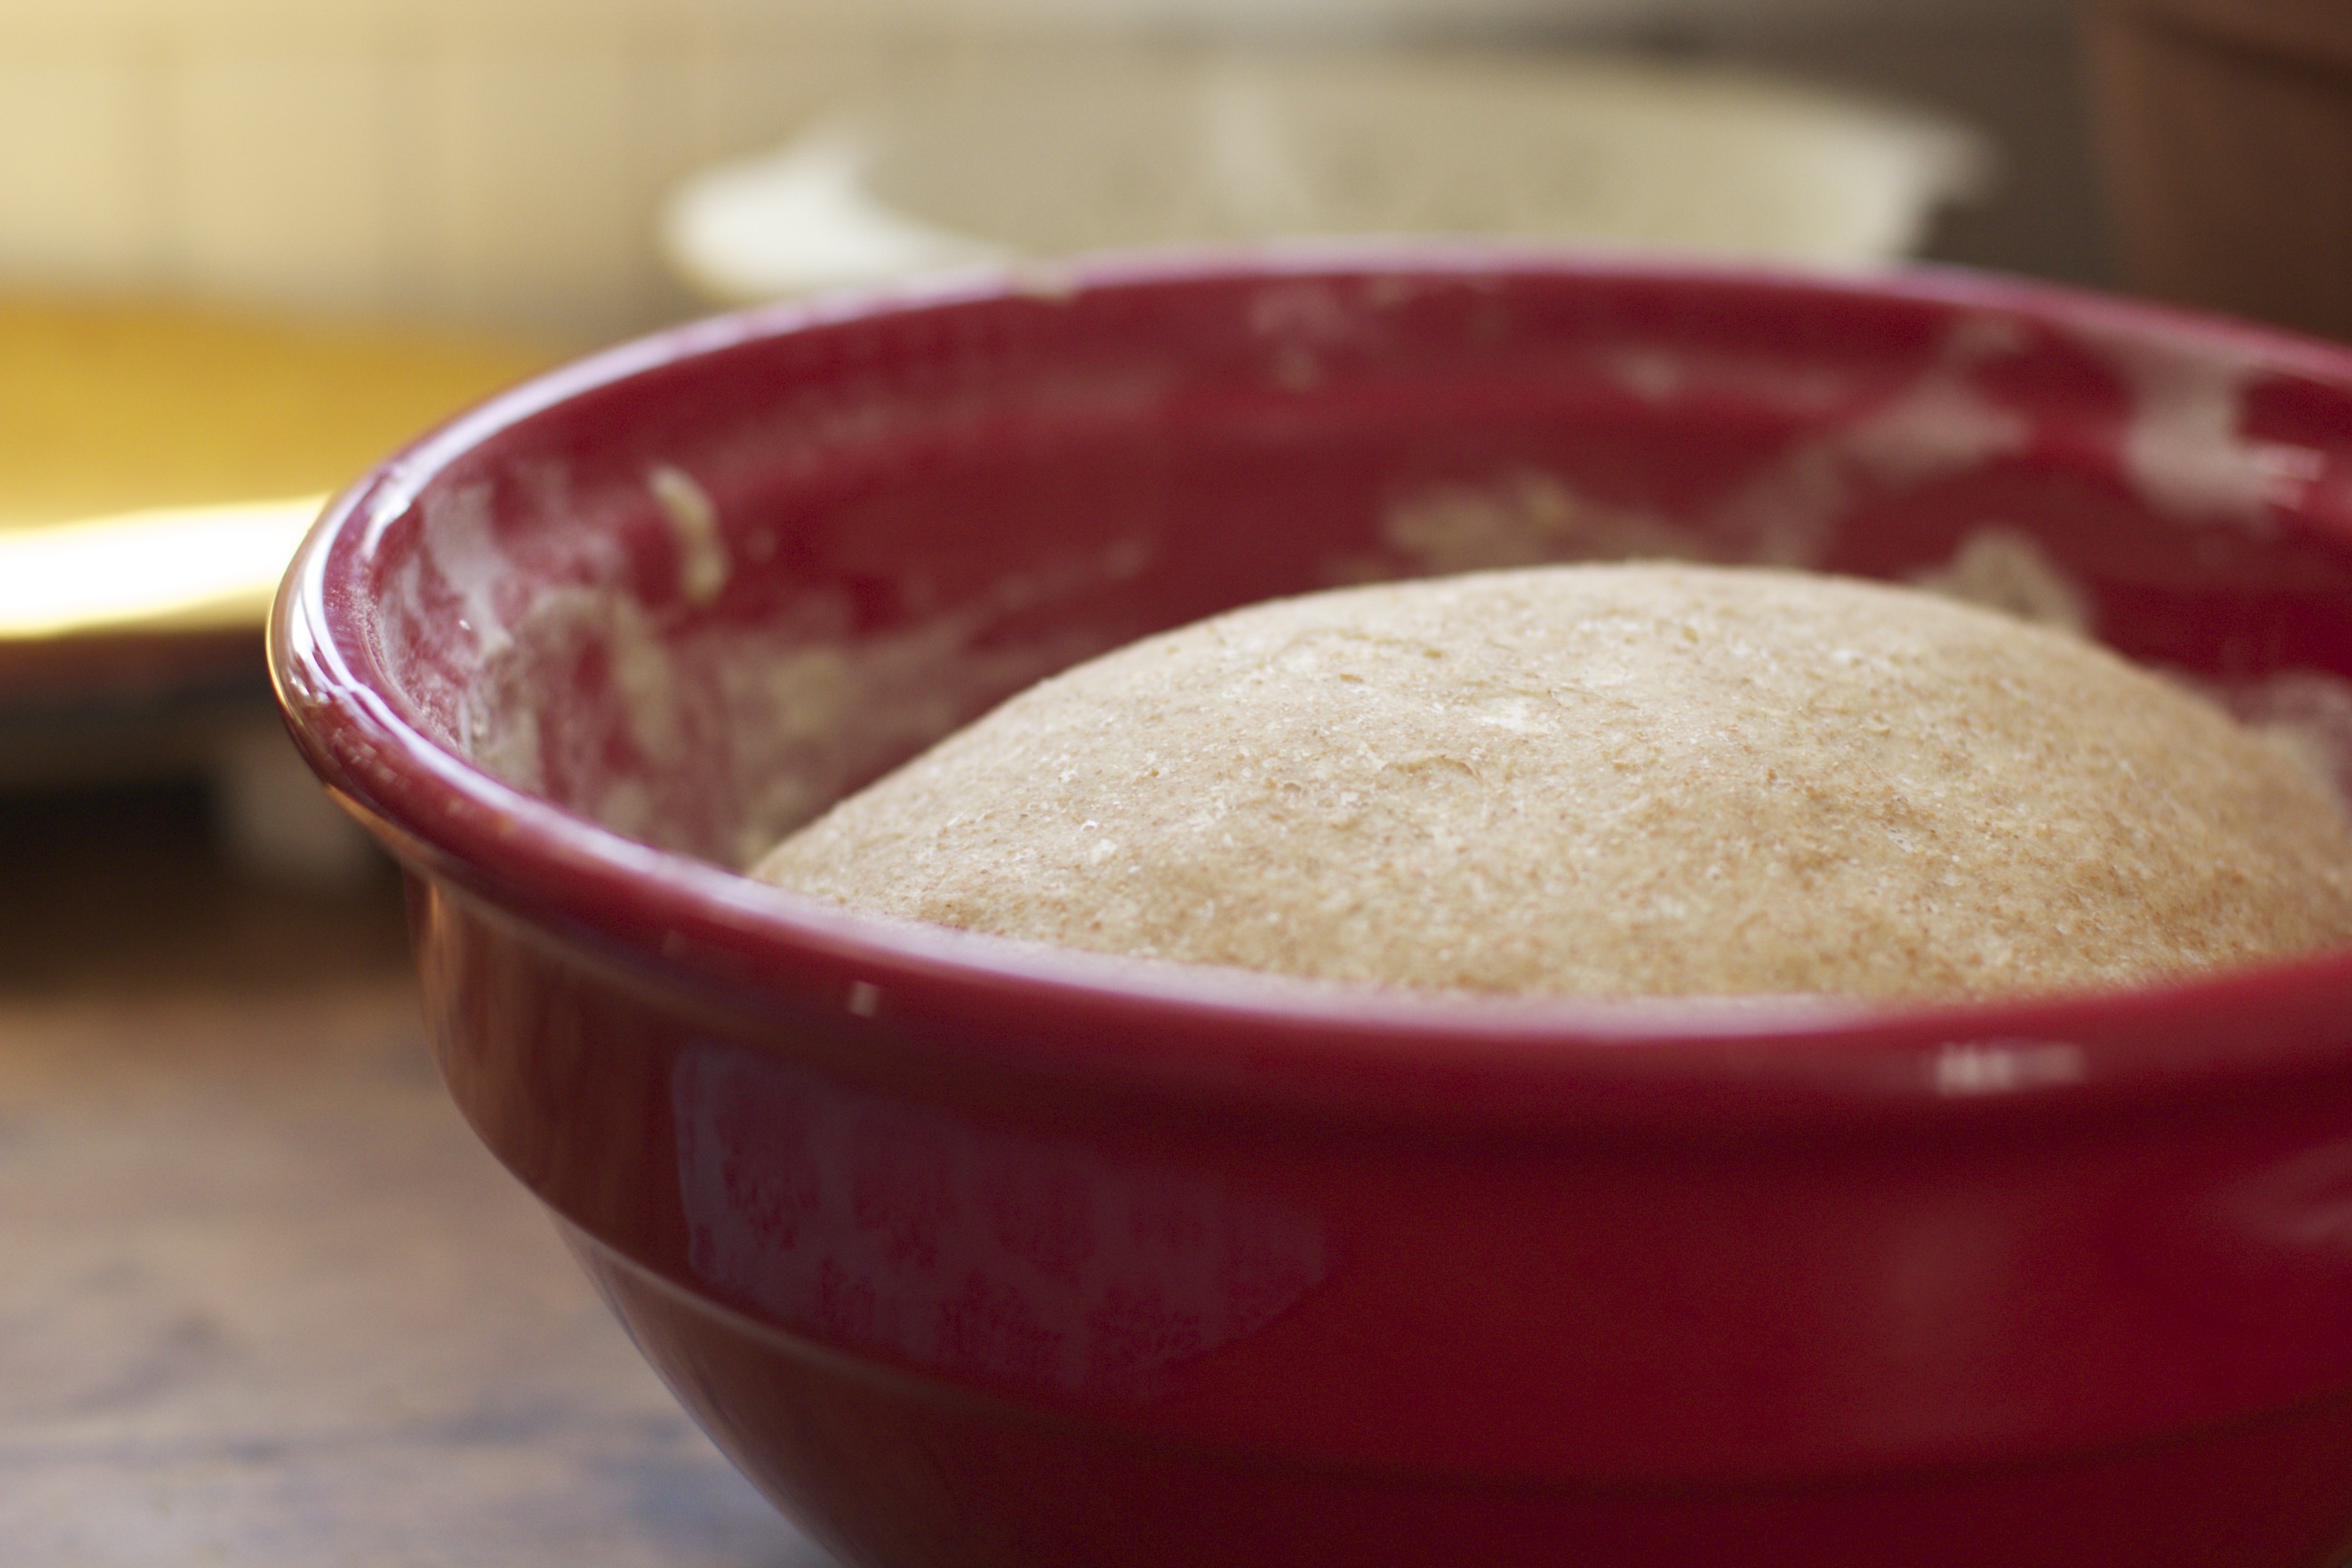
Make the sponge: combine flour, water, honey or sugar, and yeast in a large bowl. Stir until smooth.
Mix the whole wheat flour and yeast and dump that on top of the sponge to cover it, but do not mix it in. Cover the bowl and let rise for 1-4 hours at room temperature or cover with plastic or an airtight lid and refrigerate for up to 24 hours. When you have reached your desired rising time, stir the flour into the sponge to create a shaggy dough. Then add:
4.5 ounces (9 tablespoons) unsalted butter, softened
2 1/4 teaspoons salt
Using a spoon or your hands, stir the butter and salt into the dough. When it is mostly combined, begin to knead the dough until it comes together. If there is extra flour that cannot be incorporated, sprinkle that onto the counter and knead the dough on the counter for about 5 minutes. It will be sticky but should become much smoother as you knead. Let the dough rest for 20 minutes so that it will become less sticky and be easier to work with.
Knead the dough for 5 minutes more, until it is very smooth and stretchy. If it is still very sticky you can add a little more flour. Let the dough rest for a few minutes then add:
5 ounces (1 cup) raisins
Knead in the raisins as much as you can but know that they will become more evenly distributed after the first rise. Return the dough to the bowl (lightly oiling the bowl if you wish), cover, and let rise for 1 1/2 to 2 hours or until doubled in size.
After the dough has risen, scrape the dough onto a lightly floured counter. Gently press the dough to form a rectangle. Fold each short end of the rectangle toward the middle (like a business letter) and and then form the dough back into a ball. Return the dough to the bowl, cover and refrigerate for 1 hour before rolling and shaping.
For the cinnamon sugar spiral:
2.6 ounces (1/4 cup plus 2 tablespoons) sugar
4 teaspoons cinnamon
1 egg, lightly beaten
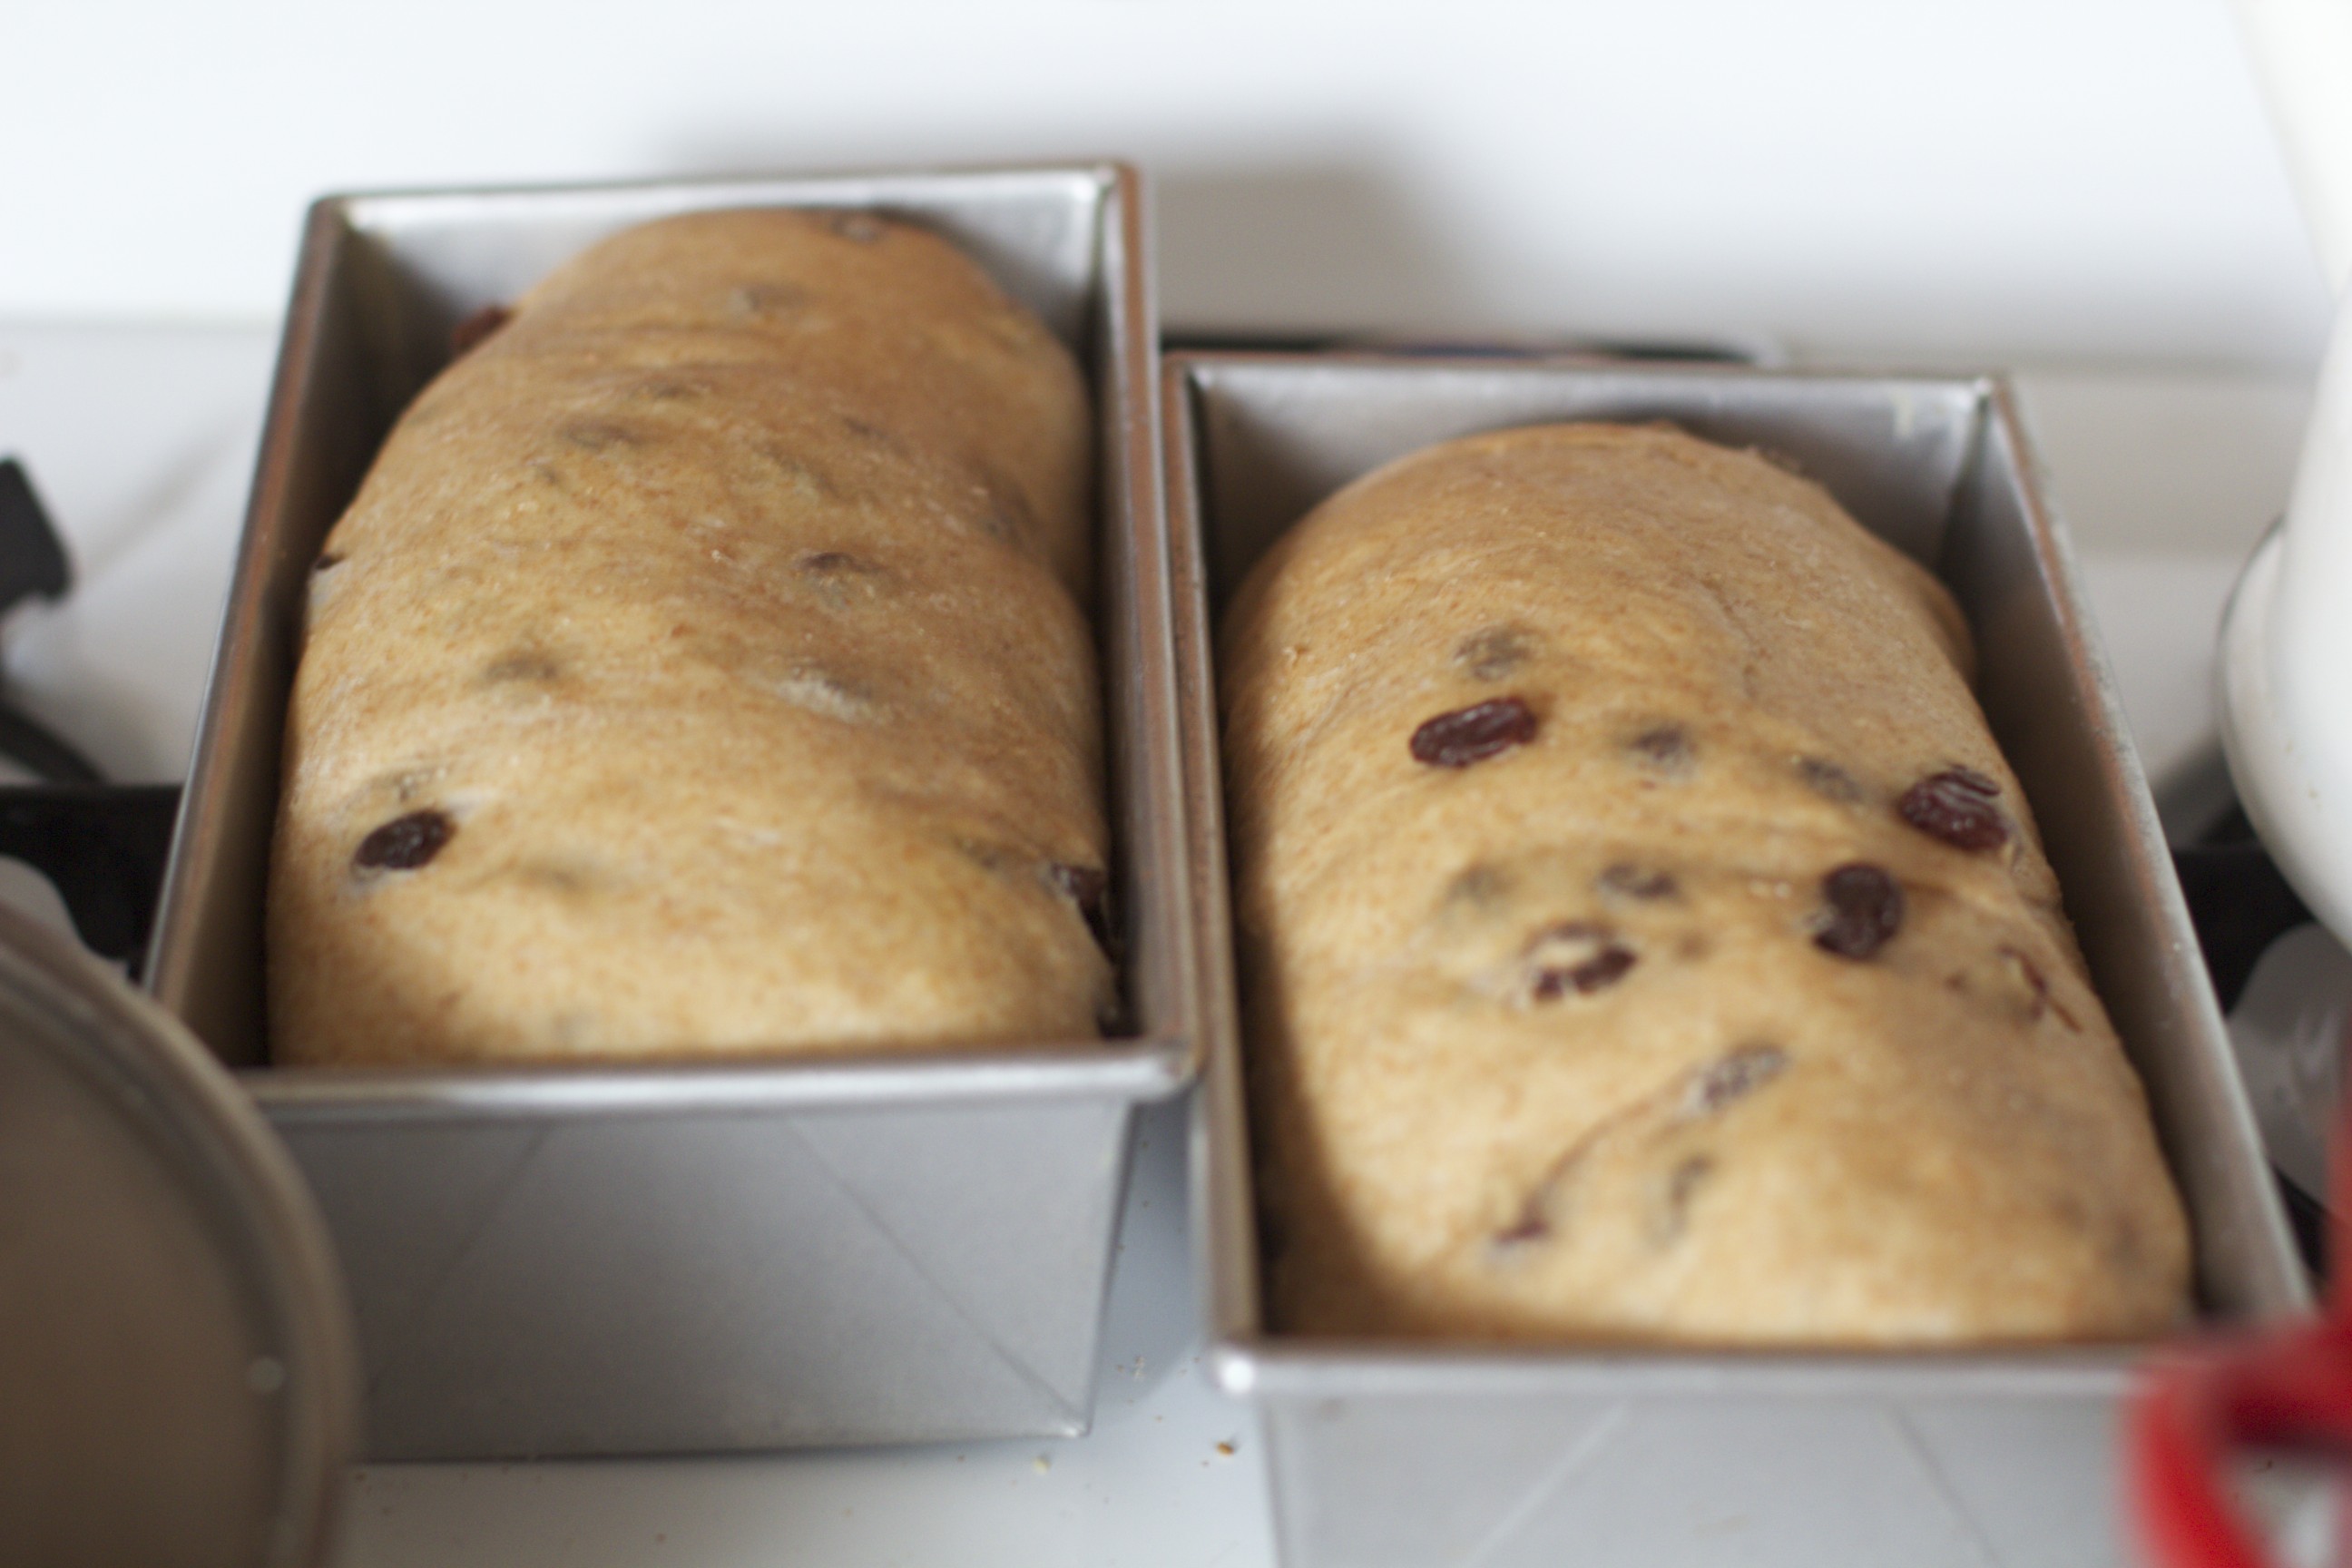
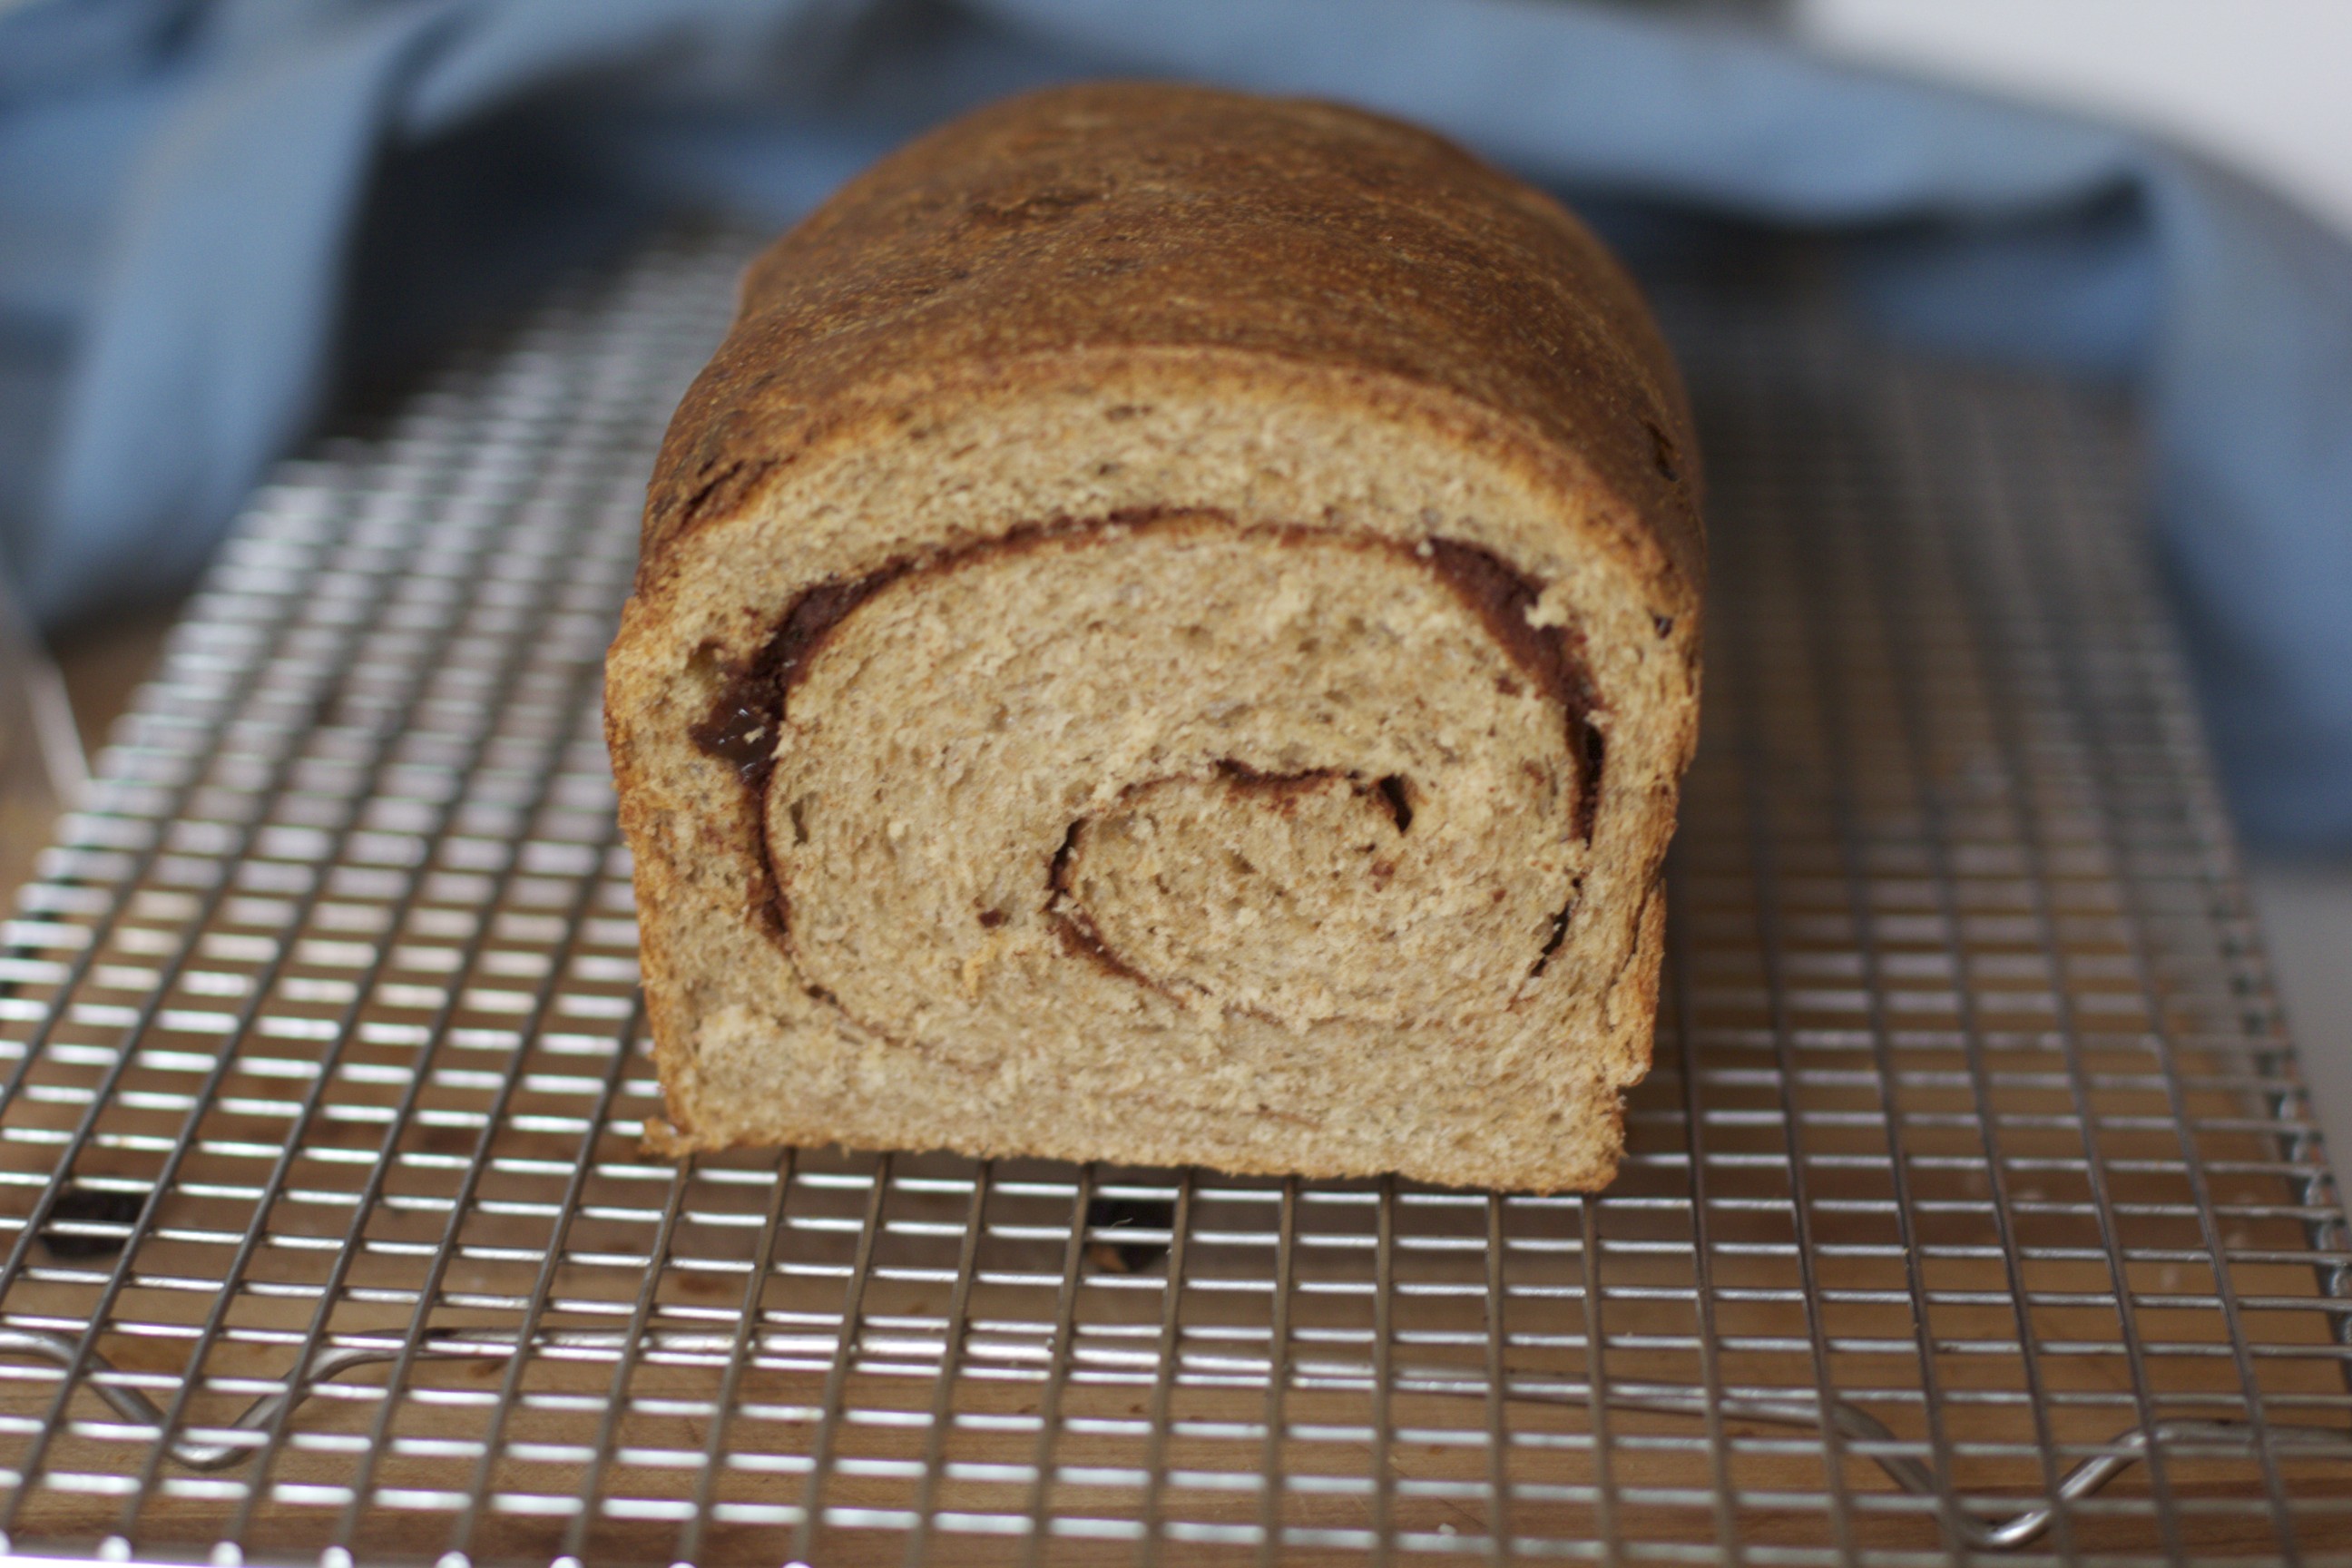
While the dough is chilling, grease two loaf pans and stir the sugar and cinnamon together. After the dough has chilled, place it on the counter and cut it in half. Gently press or use a rolling pin to make one half of the dough into a rectangle about 7 1/2 inches wide, 14 inches long, and 1/4 inch thick. Brush the surface of the rectangle with the egg and sprinkle half of the cinnamon sugar evenly over the egg wash, leaving a half inch margin around the edges. Beginning with a short end of the rectangle, roll the dough in a tight spiral. Pinch the ends and side together so that the edges are completely sealed. Tuck the loaf into the prepared pan, squishing a little if necessary to get it to fit. Repeat the spiral with the other loaf.
Cover the loaves and let them rise for 1 to 2 hours or until the dough is close to the top of the pan or slightly above it. Preheat the oven to 350 degrees F. When the dough has risen and the oven is ready, place the loaves in the oven and bake for 50 minutes. The loaves should be golden brown and the internal temperature of the bread should be about 211 degrees F when checked with thermometer.
Remove the loaves from the pans and let cool on a rack for at least 45 minutes before slicing. The bread will keep for a few days on the counter or can be frozen for eating later.